Code::Blocks Troubleshooting Tips
One of the most common problems that students have had with
Code::Blocks is that after it has been
first set up it won't run the compiler. There are a number of possible causes:
- There is no compiler installed.
Code::Blocks is mainly just a user interface. It requires a separtate
compiler and C++ libraries to do the actual compiling, linking, and
debugging. In the Code::Blocks setup menu this is referred to as a
"toolchain". If you already have a compiler and it's associated tools
installed on your computer, then you can just install Code::Blocks by itself
and it will use the compiler that is already installed. It supports quite a
few compilers: Visual Studio C++, GNU Compiler Collection (GCC),
MinGW (Minimal GCC for Windows), etc. The setup file for just the Code::Blocks
IDE by itself is:
codeblocks-10.05-setup.exe. But if you don't already have a compiler
instaled on your computer, then you should install Code::Blocks
with MinGW. The combined setup file for Code::Blocks and MinGW is:
codeblocks-10.05mingw-setup.exe. This is the setup file that will work
the best in most situations.
Solutions
- Reinstall Code::Blocks using the setup program that includes
MinGW:
codeblocks-10.05mingw-setup.exe
- Solution b: Leave Code::Blocks installed, but install a
compiler/toolchain to work with it. You can download the setup progam for
MinGW here:
MinGW download page. When you run the MinGW installer, be sure to select
the C++ compiler and the MinGW Developer Toolkit in addition to the MinGW base files.
Important: After installing MinGW, you need to set the toolset path in
Code::Blocks to point to your MinGW installation. See the section below
for instructions.
- The compiler is installed, but Code::Blocks can't find it.
Solutions
- Use the Code::Blocks auto-detect feature to find the compiler
- On the Code::Blocks menu, go to "Settings", next click on
"Compiler and Debugger...". This will open the "Compiler and
debugger settings dialog".
- Under "Selected compiler" select the name of the compiler you
are using. For most of you it will be "GNU GCC Compiler".
- Click on the tab that says "Toolchain executables", then click
the button "Auto-detect". This should cause the compiler's
installation directory to be automatically inserted into the text
box to the left of the button.
- Manually enter the path to the compiler's installation directory
- On the Code::Blocks menu, go to "Settings", next click on
"Compiler and Debugger...". This will open the "Compiler and
debugger settings dialog".
- Under "Selected compiler" select the name of the compiler you
are using. For most of you it will be "GNU GCC Compiler".
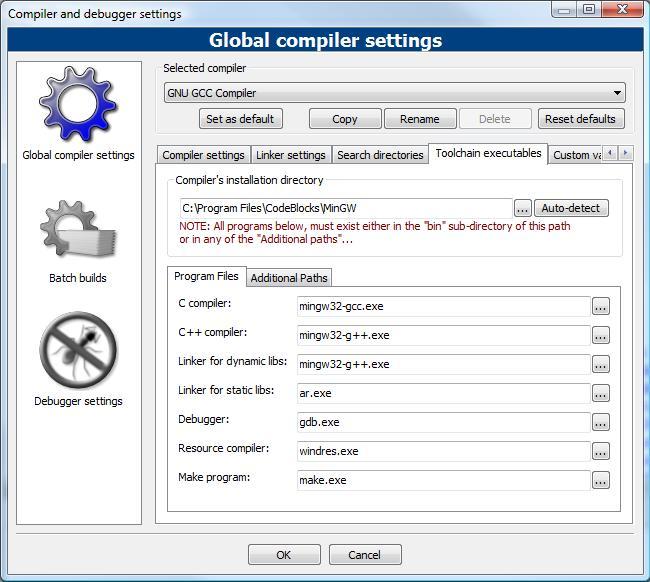
- Click on the tab that says "Toolchain executables", then type in
the path to the compiler's installation directory in the text box
labeld "Compiler's installation directory".
- Be sure the names of all the executables are entered in the
spaces listed under "Program Files".
The screen shot below shows the default
compiler and debugger settings if you installed Code::Blocks with the setup
program that includes MinGW. These settings are the same on Windows XP, Vista, and Windows 7.
(I've personally installed and tested Code::Blocks on 32 bit versions of each
Windows OS and the 64 bit version of Windows 7.)
- You don't have permission to write to the directory
(folder) where your source code (.cpp file) is located.
Solution
Save your source file to your Documents folder, or some other
location (like the desktop) that you know your user login has permission to
write to.
- You created a .c source file instead of a .cpp source file.
Solution
Using the "Save as" option from the Code::Blocks file menu, save the source
file as a .cpp file.
by Brian Bird
for CS133G Beginning C++ for Gaming
Lane Community College